Crochet Colorblock Phone Crossbody Bag – Easy Textured Crochet Pattern
Intro
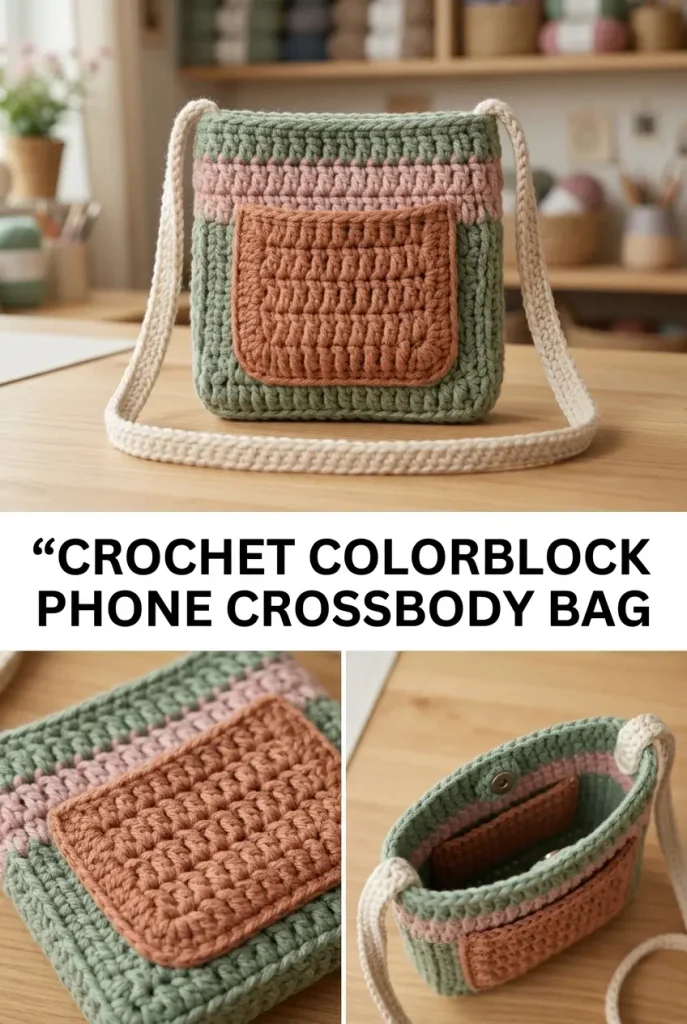
Looking for a small crochet project that is both beautiful and useful? This colorblock crochet phone crossbody bag combines soft sage green, dusty pink, and warm terracotta into a practical little bag for your phone, cards, keys, lip balm, and other everyday essentials.
The simple construction makes it a relaxing project, while the textured stitches give the finished bag a handmade, boutique-style look.
Description
This crochet crossbody bag is made from two matching rectangular body panels, joined around the sides and bottom to create the pouch. A separate terracotta front pocket is sewn onto the front, while two soft pink rows create the decorative colorblock stripe near the top.
The bag has a simple crocheted cord strap attached securely to the upper corners. An optional magnetic snap can be added to keep the opening closed.
The pattern uses basic stitches and is suitable for a confident beginner.
Finished Size
- Bag body: approximately 18 cm / 7 in wide
- Height: approximately 13 cm / 5 in
- Strap: approximately 120 cm / 47 in
- Measurements can vary depending on yarn, hook size, and tension.
Materials
- Worsted-weight cotton yarn
- Color A: Sage green, approximately 50 g
- Color B: Dusty pink, approximately 20 g
- Color C: Terracotta or warm clay, approximately 25 g
- 4.0 mm crochet hook
- Yarn needle
- Scissors
- Stitch markers
- Optional 12 mm magnetic snap
- Measuring tape
Abbreviations
US crochet terminology:
- ch — chain
- sc — single crochet
- hdc — half double crochet
- dc — double crochet
- sl st — slip stitch
- st / sts — stitch / stitches
- sp — space
- BLO — back loop only
Pattern Notes
- The main bag is crocheted in rows, working back and forth.
- The two body panels are made separately.
- The pink stripe is added across the upper portion of both panels.
- The front pocket is crocheted separately and sewn onto the front panel.
- The panels are joined around the sides and bottom, leaving the top open.
- The strap is crocheted separately and sewn firmly to the upper corners.
- Keep your tension consistent so both body panels are the same size.
- Always count your stitches at the end of each row.
Complete Crochet Instructions
1. Main Bag Body — Make 2 Panels
Using Color A — Sage Green, chain 20.
Row 1
Hdc in the 2nd chain from the hook and in each chain across.
19 hdc
Rows 2–24
Ch 1 and turn.
Hdc in each stitch across.
19 hdc
Fasten off.
Make a second identical panel, but do not change the number of rows.
Important
The two panels should be the same width and height before you begin assembly.
2. Add the Dusty Pink Stripe
The pink stripe is worked across the upper portion of each green panel.
Attach Color B — Dusty Pink along the top edge of one panel.
Row 1
Ch 1 and hdc evenly across the top edge.
Row 2
Ch 1, turn, and hdc in each stitch across.
Fasten off and weave in the end.
Repeat the same two-row stripe on the second body panel.
This creates the soft pink colorblock section visible near the top of the finished bag.
3. Crochet the Front Pocket
Using Color C — Terracotta, chain 14.
Row 1
Hdc in the 2nd chain from the hook and in each chain across.
13 hdc
Rows 2–9
Ch 1 and turn.
Hdc in each stitch across.
Fasten off, leaving a long yarn tail for sewing.
Pocket Edging
Join Color C near the top corner of the pocket.
Work single crochet evenly around the sides and bottom of the pocket.
At each lower corner, work approximately 3 sc in the corner to help the edging turn neatly.
Do not add extra bulk to the top edge.
Fasten off and leave enough yarn for attaching the pocket.
4. Assemble the Bag
Place the two main body panels together with the wrong sides facing each other and the matching edges aligned.
Using Color A — Sage Green, join the panels.
Joining
Starting at one bottom corner:
- Sc through both layers along the bottom.
- Continue up the first side.
- Work approximately 3 sc in each corner to create a smooth turn.
- Continue around the second side.
- Keep the top edge completely open.
Fasten off and weave in all loose ends.
Turn the bag so the finished sides are facing outward.
The result should now look like a small rectangular pouch.
5. Attach the Front Pocket
Place the terracotta pocket centrally on the front panel.
Position it:
- Below the dusty pink stripe
- Evenly spaced from the left and right edges
- With the top edge straight
- With the pocket opening facing upward
Use the long terracotta yarn tail to sew around the bottom and two side edges.
Leave the top edge open so the pocket can hold small items.
Secure the yarn firmly on the inside and weave in the end.
6. Finish the Top Edge
Using Color A — Sage Green, join the yarn at one upper corner.
Work one round of single crochet evenly around the entire top opening.
Keep your stitches even and avoid pulling the yarn too tightly.
When you reach the starting point, join with a slip stitch.
Fasten off and weave in the end.
This gives the opening a clean, sturdy finish.
7. Crochet the Crossbody Strap
Using Color A or a neutral cotton cord, chain 4.
Strap Row
Turn and slip stitch into the back bump only of each chain.
Continue working slip stitches along the strap in the same manner.
Repeat until the strap reaches approximately 120 cm / 47 in.
For a shorter shoulder strap, stop earlier; for a longer crossbody strap, continue for additional length.
Fasten off and weave in the ends.
Alternative Strap
For an even stronger strap, you can crochet a narrow foundation chain and work several rows of single crochet instead of making a slip-stitch cord.
8. Attach the Strap
Place one end of the strap securely at each upper back corner of the bag.
Sew each end several times through the bag layers.
For extra strength, reinforce the attachment with a small square or crossed stitching pattern.
Weave the remaining yarn securely inside the bag.
Before using the bag, gently pull on the strap to make sure the attachment points are strong.
9. Optional Magnetic Snap
A magnetic snap can be added to the top opening.
Position one half on the inside front and the matching half on the inside back.
Make sure both pieces are perfectly aligned before sewing them in place.
If you prefer a zipper or button closure, the top opening can be adapted accordingly.
Tips and Variations
Change the Colors
Try different combinations such as:
- Sage + cream + rust
- Olive + blush + caramel
- Beige + dusty blue + brown
- Mustard + cream + terracotta
Make It Larger
Increase the foundation chain for a wider bag and add additional rows for more height.
Remember to make both body panels exactly the same size.
Make It Smaller
Reduce the foundation chain and number of rows for a compact mini bag.
Strengthen the Bag
For a more durable everyday bag, use sturdy cotton yarn and crochet with a slightly tighter tension.
You can also sew in a lightweight fabric lining.
Adjust the Strap
Make the strap shorter for a shoulder bag or longer for a comfortable crossbody bag.
FAQs
Is this crochet bag beginner-friendly?
Yes. The project uses basic crochet stitches and simple construction. The most important part for beginners is keeping both panels the same size and maintaining an even tension.
What can I carry inside?
The finished size is suitable for a smartphone, cards, keys, lip balm, earbuds, and other small everyday essentials.
Can I wash the finished bag?
If you use washable cotton yarn, gentle hand washing in cool water is recommended. Reshape the bag and lay it flat to dry.
Conclusion
This Crochet Colorblock Phone Crossbody Bag is a small project with plenty of personality. The sage green body, dusty pink stripe, and terracotta pocket create a warm handmade look, while the compact size makes the bag genuinely useful.
It is also easy to customize with different colors, strap lengths, closures, or a lining.
Whether you make one for yourself or as a handmade gift, this little crochet bag is a practical project that can be finished without requiring complicated techniques.
Happy crocheting!
:::