Intro
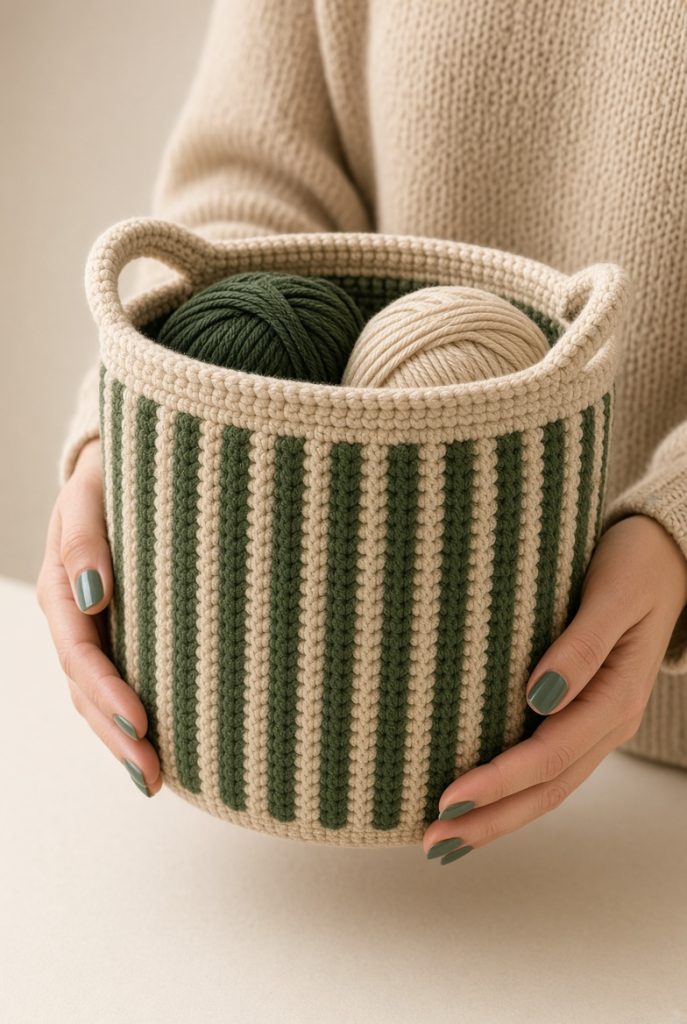
Looking for a storage project that looks good enough to leave out? This striped crochet storage basket combines soft beige and deep forest green into a practical, beautiful container for yarn, blankets, toys, or everyday items.
It features sturdy textured sides, two integrated handles, and a clean, handmade look that works in any room. The construction is straightforward and relaxing, making it a satisfying project for confident beginners and intermediate crocheters.
Description
This basket is worked from the bottom up in continuous rounds. The base is solid beige, followed by vertical colorblock stripes created by alternating green and beige sections. The textured effect comes from working front post and back post stitches on the sides for a ribbed, sturdy fabric.
Two strong integrated handles are crocheted directly into the top rim. The finished basket has a firm structure that stands nicely on its own and looks beautiful even when empty.
Finished Size
- Diameter: approximately 28–30 cm / 11–12 in
- Height (including handles): approximately 22–24 cm / 8.5–9.5 in
- Handle height: approximately 6–7 cm / 2.5 in
Measurements can vary depending on yarn, hook size, and tension.
Materials
- Worsted-weight or aran-weight cotton yarn (or sturdy cotton blend)
- Color A: Soft beige / warm cream – approximately 180–200 g
- Color B: Deep forest green – approximately 120–140 g
- 5.0 mm or 5.5 mm crochet hook (choose size for a firm fabric)
- Yarn needle
- Scissors
- Stitch markers
- Measuring tape
Optional: Fabric lining for extra structure.
Abbreviations (US terms)
ch – chain sc – single crochet hdc – half double crochet dc – double crochet fpdc – front post double crochet bpdc – back post double crochet sl st – slip stitch st(s) – stitch(es) inc – increase (2 stitches in the same stitch) BLO – back loop only
Pattern Notes
- The basket is worked in continuous rounds unless otherwise stated.
- Use a stitch marker to mark the beginning of each round.
- Keep tension firm so the basket holds its shape.
- Color changes for the stripes are worked by switching yarn at the end of the relevant stitches.
- The textured ribbing (fpdc/bpdc) starts after the base is complete.
- Handles are worked as part of the final top rounds.
Complete Crochet Instructions
1. Base (Color A – Beige)
Make a magic ring.
Round 1: 8 hdc into the ring. (8) Round 2: 2 hdc in each st. (16) Round 3: 1 hdc, 2 hdc in next st; repeat around. (24) Round 4: 1 hdc in next 2 sts, 2 hdc in next st; repeat around. (32) Round 5: 1 hdc in next 3 sts, 2 hdc in next st; repeat around. (40) Round 6: 1 hdc in next 4 sts, 2 hdc in next st; repeat around. (48) Round 7: 1 hdc in next 5 sts, 2 hdc in next st; repeat around. (56) Round 8: 1 hdc in next 6 sts, 2 hdc in next st; repeat around. (64) Round 9: 1 hdc in next 7 sts, 2 hdc in next st; repeat around. (72) Round 10: 1 hdc in next 8 sts, 2 hdc in next st; repeat around. (80)
Base should measure approximately 26–28 cm across. Adjust by adding or removing one increase round if needed.
2. Begin Sides (Color A – Beige)
Rounds 11–12: Hdc in each stitch around. (80)
3. Create the Vertical Stripes + Texture
You will now work vertical stripes (alternating Color B green and Color A beige) while adding texture with front post and back post stitches.
Setup for stripes: Divide the 80 stitches into 8 equal sections of 10 stitches each. Work 5 sections in green and 3 sections in beige, or adjust to your preferred stripe width (the photo shows roughly equal alternating vertical panels).
Round 13 (first textured round): Work 10 fpdc in Color B (green), then 10 fpdc in Color A (beige); repeat the color sequence around, keeping the same color blocks stacked vertically.
Round 14: Work bpdc in each stitch, matching the colors of the previous round so the vertical stripes continue cleanly.
Rounds 15–24: Continue alternating:
- Odd rounds: fpdc in each stitch (matching colors)
- Even rounds: bpdc in each stitch (matching colors)
This creates the sturdy ribbed texture and the clean vertical colorblock look seen in the photo. Work a total of 12 textured rounds (or until the basket body reaches about 16–18 cm high before the top rim).
4. Top Rim & Integrated Handles (Color A – Beige)
Switch fully to Color A (beige).
Round 25: Hdc in each stitch around. (80)
Round 26: Hdc in each stitch around.
Round 27 (create handle openings): Hdc in next 18 sts, ch 12 (first handle), skip 12 sts, hdc in next 28 sts, ch 12 (second handle), skip 12 sts, hdc in remaining 10 sts.
Round 28: Hdc in each hdc and work 12 hdc into each chain-12 space (this forms the solid handles).
Rounds 29–30: Hdc in each stitch around (including around the handles) for a thick, sturdy rim.
Round 31 (optional thicker edge): Working in BLO, hdc in each stitch around.
Join with a slip stitch, fasten off, and weave in all ends securely.
Tips and Variations
Change the Colors
- Beige + sage green
- Cream + terracotta
- Soft gray + dusty blue
- Mustard + cream
Make It Larger or Smaller
- Larger: Continue base increases to 88 or 96 stitches and add more textured side rounds.
- Smaller: Stop base increases earlier (around 64–72 stitches) and reduce side height.
Strengthen the Basket
- Use 100% cotton or a thick cotton blend.
- Work with a slightly tighter tension.
- Add a fabric lining for extra durability and a polished finish.
Handle Options The integrated handles shown are strong and comfortable. For even sturdier handles, crochet a second layer of hdc over the chain spaces.
FAQs
Is this pattern beginner-friendly? It is suitable for confident beginners who know basic stitches and are comfortable with front/back post stitches and simple color changes. The texture is what gives the basket its beautiful sturdy look.
What can I store inside? Yarn, blankets, toys, magazines, toiletries, or any household items. It is designed to look good enough to leave out on display.
Can I wash the finished basket? Yes, if made with cotton yarn. Hand wash gently in cool water, reshape, and dry flat.
My stripes are not lining up. Make sure you always switch colors at the exact same stitch positions each round so the vertical panels stay straight.
Conclusion
This Striped Crochet Storage Basket with Handles is a practical and stylish project that looks beautiful enough to leave on display. The combination of soft beige and deep green, the sturdy textured sides, and the integrated handles make it both useful and decorative.
It is easy to customize with different colors or sizes, and it makes a wonderful handmade gift or a useful addition to your own home.
Happy crocheting!