Intro
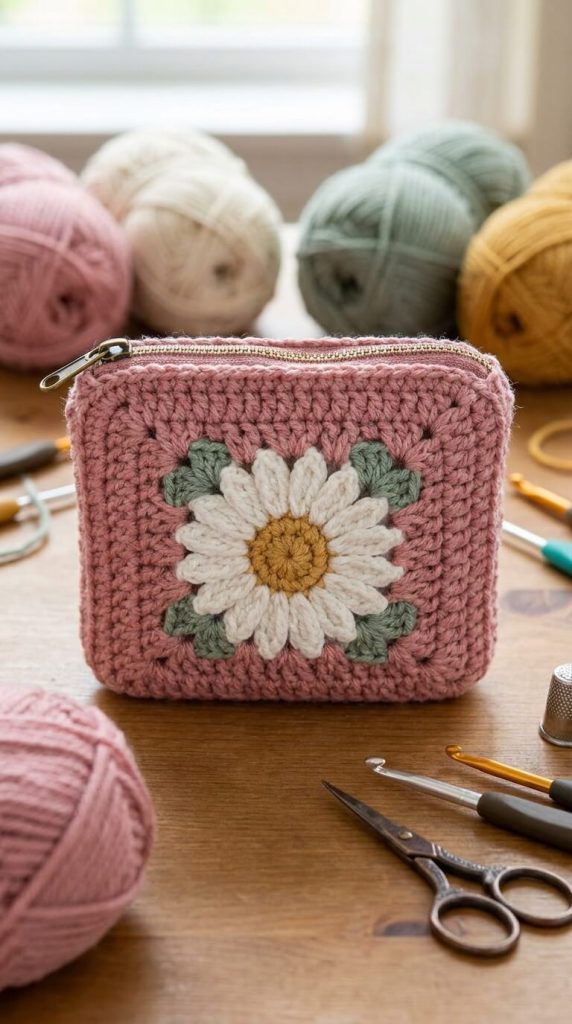
Looking for a sweet and practical little crochet project? This soft pink zipper pouch features a beautiful white daisy with a golden center and sage green leaves. It is the perfect size for coins, cards, lip balm, earbuds, or other small essentials, and the zipper keeps everything secure.
A charming handmade accessory that makes a lovely gift or a pretty addition to your own bag.
Description
The pouch is built around a single daisy granny square that forms the front. The back is a matching solid pink square. The two pieces are joined on three sides, a zipper is sewn along the top, and a clean border finishes the edges. The raised daisy motif gives it a lovely dimensional look.
The pattern is suitable for confident beginners who know basic granny square techniques and feel comfortable sewing in a zipper.
Finished Size
- Width: approximately 13–14 cm / 5–5.5 in
- Height: approximately 11–12 cm / 4.25–4.75 in
Measurements can vary depending on yarn, hook size, and tension.
Materials
- Worsted-weight or DK-weight cotton yarn
- Color A: Soft dusty pink – approximately 40 g
- Color B: White – small amount
- Color C: Mustard / golden yellow – small amount
- Color D: Sage green – small amount
- 3.5 mm or 4.0 mm crochet hook
- Yarn needle
- Scissors
- 12–14 cm / 5–5.5 in zipper (matching or gold)
- Sewing needle and thread (to attach zipper)
- Measuring tape
- Optional: stitch markers
Abbreviations (US terms)
ch – chain sc – single crochet hdc – half double crochet dc – double crochet sl st – slip stitch st(s) – stitch(es) sp – space
Pattern Notes
- The daisy is worked as a flower motif in the center of the square.
- The pink background is filled in to create a neat square.
- Make two squares (one with the daisy for the front, one solid for the back).
- The zipper is sewn in after the squares are joined on three sides.
Complete Crochet Instructions
1. Daisy Center (Color C – Yellow)
Make a magic ring.
Round 1: Ch 2 (counts as hdc), work 11 hdc into the ring. Join with sl st to top of ch-2. (12 hdc) Fasten off yellow.
2. Daisy Petals (Color B – White)
Join white in any stitch.
Round 2: Ch 3, 2 dc in same st, ch 3, sl st in next st; repeat from * to * around. You will have 6 rounded petals. Fasten off white and weave in ends.
3. Green Leaves (Color D – Sage Green)
Join green in a space between two petals.
Round 3: Ch 3, 2 dc in same space, ch 3, sl st in next space between petals; repeat around to create small leaf shapes. Alternatively, work simple sc or hdc clusters between petals for a softer look. Fasten off green.
4. Pink Background – Complete the Square (Color A – Pink)
Join pink in any space around the daisy.
Round 4: Work dc evenly around the daisy, placing 3 dc in each corner space to begin forming the square. Aim for a total of about 12–14 dc per side including corners.
Round 5: Ch 3 (counts as dc), dc in each st around, working 3 dc in each corner. Join with sl st.
Round 6 (optional): Repeat Round 5 if you need a slightly larger square (approximately 12–13 cm).
Fasten off and weave in ends.
5. Back Square Using Color A only, make a plain solid square of the same size: Magic ring, work increasing rounds of dc until it matches the front square exactly.
6. Assemble the Pouch
- Place the front (daisy) and back squares together with wrong sides facing.
- Using pink yarn, sc or whip stitch along the bottom and both short sides, leaving the top open.
- Weave in ends.
7. Attach the Zipper
- Pin the zipper along the open top edge, centered.
- Using a sewing needle and matching thread, sew the zipper securely to both the front and back edges.
- Open and close the zipper to check it moves smoothly.
- Weave in any remaining yarn ends.
8. Optional Finishing Border Work one round of single crochet around the entire outer edge of the pouch (avoiding the zipper teeth) for a neat, finished look.
Tips and Variations
Change the Colors
- Dusty pink background with white daisy (as shown)
- Cream background with soft yellow or blush daisy
- Sage green background with white daisy
- Soft gray with pastel daisy
Make It Larger Add more rounds to the pink background and use a longer zipper for a bigger pouch or small clutch.
Make It Smaller Stop after fewer background rounds and use a shorter zipper for a tiny coin purse.
No Zipper Version Add a button flap or simple drawstring instead of a zipper.
Strengthen the Pouch Use cotton yarn and a slightly tighter tension. You can also line the inside with thin fabric for extra durability.
FAQs
Is this pattern beginner-friendly? It is suitable for makers who already know basic granny square construction and feel comfortable sewing in a zipper. The daisy motif is simple and fun.
What can I carry inside? Coins, cards, lip balm, earbuds, small jewelry, or other everyday essentials.
Can I wash the finished pouch? Yes, if made with cotton yarn. Gentle hand washing in cool water is recommended. Reshape and lay flat to dry. Avoid machine washing if the zipper is delicate.
My daisy looks uneven. Make sure the petals are worked evenly and the green leaves sit neatly between them before starting the pink background.
Conclusion
This Crochet Daisy Zipper Pouch is a cheerful little project that combines classic crochet with everyday usefulness. The soft pink background and bright daisy motif create a fresh, handmade look that feels special without being complicated.
It is quick to make, easy to customize with different flower colors, and perfect as a sweet gift or a useful addition to your own bag. Whether you keep coins, cards, or little treasures inside, this pouch is sure to bring a smile.
Happy crocheting!