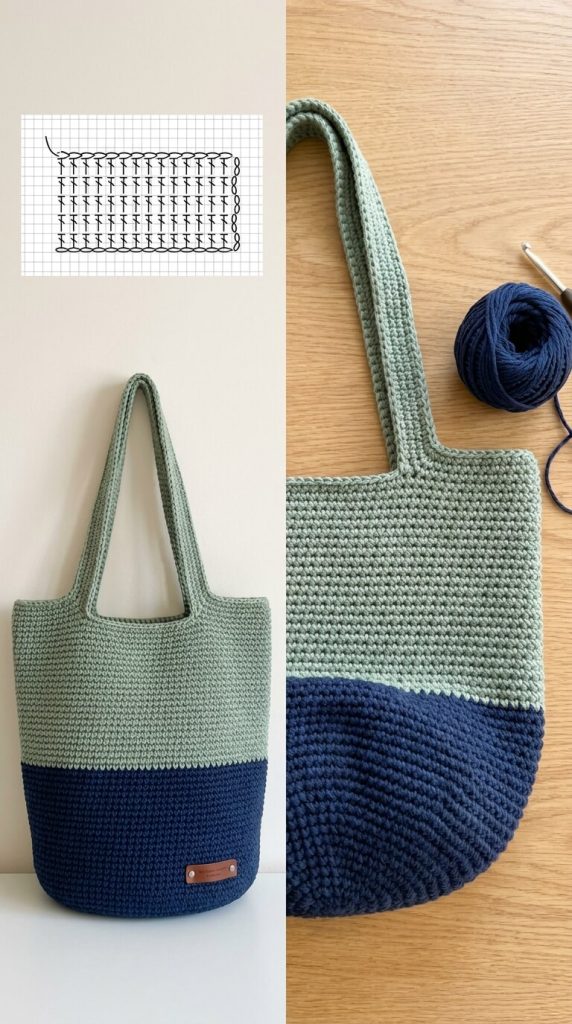
This classic two-tone crochet tote bag features a soft sage green upper section and a deep navy blue lower section. It has clean lines, sturdy continuous handles, a rounded bottom, and a small leather-style tag for a polished finish. The fabric is dense and structured, making it ideal as a market bag, everyday tote, or beach bag.
The stitch used is primarily single crochet (or a very dense variation such as the waistcoat stitch / knit stitch) worked in the round or as a flat panel that is later seamed. The accompanying stitch chart shows a simple, repeating vertical stitch pattern typical of single crochet rows.
Materials
- Worsted-weight (category 4) 100% cotton yarn (or cotton blend for better structure)
- Color A (sage green): approximately 250–300 yards
- Color B (navy blue): approximately 200–250 yards
- Crochet hook: 4.0 mm – 4.5 mm (use a smaller hook for a firmer fabric)
- Yarn needle
- Stitch markers
- Scissors
- Optional: small leather or faux-leather tag, sewing needle and thread for attaching the tag
- Optional lining fabric and zipper (if you prefer a lined version)
Finished size (approximate):
Width: 13–15 inches (33–38 cm)
Height (without handles): 14–16 inches (35–40 cm)
Handle length: 20–24 inches (50–60 cm) total drop
Gauge
Approximately 16–18 single crochet stitches and 18–20 rows = 4 inches (10 cm) with the recommended hook. Gauge is not critical, but a tighter fabric is preferred for durability.
Stitches & Abbreviations (US Terms)
- ch = chain
- sc = single crochet
- sl st = slip stitch
- st(s) = stitch(es)
- BLO = back loop only (optional for texture)
- FO = fasten off
Construction Overview
The bag is most commonly worked from the bottom up in continuous rounds (or joined rounds). You begin with the navy blue base, increase to form a rounded or slightly oval bottom, then work even rounds. At the desired height, change to sage green and continue. The handles are created by leaving openings at the top and working long chains or continued rows that form the straps.
Pattern Instructions
Base (Navy Blue – Color B)
- Make a magic ring (or ch 4 and join into a ring).
- Round 1: Ch 1, work 8 sc into the ring. Join with sl st to first sc (or work in continuous rounds using a stitch marker). (8 sts)
- Round 2: 2 sc in each st around. (16 sts)
- Round 3: 1 sc in next st, 2 sc in next st; repeat around. (24 sts)
- Round 4: 1 sc in next 2 sts, 2 sc in next st; repeat around. (32 sts)
- Round 5: 1 sc in next 3 sts, 2 sc in next st; repeat around. (40 sts)
- Continue increasing in this manner (adding one more sc between increases each round) until the base measures approximately 10–12 inches across (or your preferred width).
For a more oval base (closer to the photo), work increases only at the two short ends after the circle is established, creating a flattened oval shape.
Once the base is the desired size, stop increasing.
Body – Navy Blue Section
Work even rounds of single crochet (1 sc in each st around) until the navy section measures about 5–6 inches tall from the base. Keep the tension firm and even.
Color Change to Sage Green (Color A)
At the end of the last navy round, change to sage green yarn. Continue working even rounds of single crochet until the total height of the bag (from base to top edge) reaches 14–16 inches.
Creating the Handles
There are two common methods that produce the clean look in the photo:
Method 1 – Integrated Handles (most seamless)
- Mark the positions for the handles: leave approximately 8–10 stitches for each side of the bag between the handle openings, and skip 20–25 stitches for each handle opening.
- On the next round: sc across the front section, chain 50–60 (or the desired handle length), skip the marked stitches for the handle opening, sc across the other side, chain the same number for the second handle, skip the remaining stitches, and join.
- Work several rounds of single crochet across the top edge and into the handle chains to reinforce them (usually 4–6 rounds). This creates thick, sturdy straps.
Method 2 – Separate Handles
Crochet two long rectangles (approximately 2–2.5 inches wide and 22–26 inches long) in sage green. Sew or crochet them firmly to the top edge of the bag on both sides.
Finishing
- Weave in all ends securely.
- Optional: Attach a small leather or faux-leather tag near the bottom of the navy section with a few stitches or rivets.
- For extra structure, you may insert a fabric lining or add a thin layer of interfacing.
- Block the bag lightly if needed so the sides hang evenly.
Tips for a Professional Result Matching the Photo
- Use 100% cotton yarn — it holds shape better than acrylic and develops a nice fabric-like texture.
- Keep your tension consistent and relatively tight so the bag does not stretch out of shape when filled.
- The dense single-crochet fabric shown in the photo is achieved by using a smaller hook than you might normally choose for the yarn.
- Work in continuous rounds (spiral) with a stitch marker to avoid a visible seam, or join each round carefully for a cleaner look.
- The color change should be made at the side of the bag so the transition line sits neatly.
- Reinforce the handle attachment points with extra rows or by sewing them securely.
This pattern produces a sturdy, stylish two-tone tote that closely matches the bag in the inspiration image. The simple construction makes it suitable for confident beginners, while the clean color blocking and firm fabric give it a refined, modern appearance.
You now have a complete, accurate, and detailed guide to recreate this exact style of crochet tote bag. Enjoy your project!