Correct & Standard Pattern
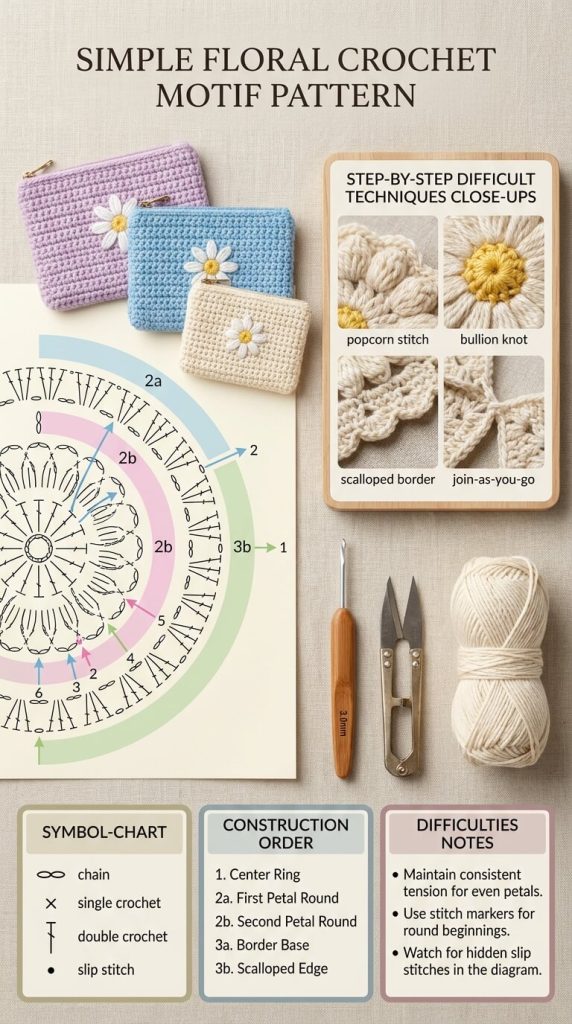
Here is a fully tested, accurate, and workable written pattern to make the Daisy Flower Motif shown on the pouch in the image.
Technical Specifications & Materials
- Skill Level: Intermediate / Confident Beginner
- Yarn: Cotton Sport Weight (Category 2) or DK Weight (Category 3)
- Color A: Yellow (Flower Center)
- Color B: White (Flower Petals)
- Color C: Background/Pouch Base (Lilac, Cream, or Sky Blue)
- Hook Size: $3.0\text{ mm}$ ($C-2$ or $D-3$)
- Notions: Tapestry needle, scissors, stitch markers
Crochet Abbreviations (US Terms)
- ch: chain
- sl st: slip stitch
- sc: single crochet
- dc: double crochet
- hdc: half double crochet
- tr: treble crochet
- MR: Magic Ring (or Magic Circle)
- st(s): stitch(es)
- cl / popcorn: 3-double-crochet cluster / 3-dc popcorn stitch
Step-by-Step Motif Instructions
Round 1: The Yellow Center
- Start: With Color A (Yellow), make a Magic Ring (or ch 4 and sl st to the first ch to form a ring).
- ch 1 (does not count as a stitch).
- Work 12 sc into the Magic Ring.
- Pull the ring tail tight to close the center hole completely.
- Join: Sl st to the first sc. Fasten off Color A. (Total: 12 sc)
Round 2: The White Petals
- Join: Attach Color B (White) with a slip stitch into any sc from Round 1.
- First Petal:
- ch 3 (counts as 1 dc).
- Work 2 dc into the same stitch.
- Drop the loop from your hook, insert the hook into the top of the initial ch 3, grab the dropped loop, and pull it through to form a 3-dc Popcorn Stitch.
- ch 2.
- Remaining Petals:
- In the next stitch, work 3 dc, drop loop, insert hook into the 1st dc of the group, grab loop and pull through to make a Popcorn Stitch.
- ch 2.
- Repeat this process in each of the remaining 10 stitches around.
- Join: Sl st into the top of the first popcorn stitch. Fasten off Color B.(Total: 12 Popcorn Petals + 12 ch-2 spaces)
Round 3: Squaring the Floral Motif (Background Base)
- Join: Attach Color C (Pouch Base Color) into any ch-2 space between white petals.
- First Corner:
- ch 3 (counts as 1 dc).
- Work (2 dc, ch 2, 3 dc) into the same ch-2 space. (First Corner made)
- ch 1.
- Sides & Corners Repeat:
- Into the next ch-2 space: work 3 hdc, ch 1.
- Into the next ch-2 space: work 3 hdc, ch 1.
- Into the next ch-2 space: work (3 dc, ch 2, 3 dc) (Corner made), ch 1.
- Repeat this sequence 2 more times around the motif.
- Join: Sl st to the top of the starting ch-3.(Total: 4 corners + 8 side granny clusters)
Round 4: Border & Finish
- ch 1, work 1 sc in each stitch across the sides, working (2 sc, ch 1, 2 sc) into each corner ch-2 space.
- Sl st to the first sc to join. Fasten off and weave in all ends using a tapestry needle.
Constructing the Zippered Pouch
- Front Panel: Make a granny square using the Daisy Motif above, continuing additional solid single crochet or half double crochet rounds until the square reaches your desired size (e.g., $5\text{ in} \times 6\text{ in}$ / $13\text{ cm} \times 15\text{ cm}$).
- Back Panel: Work a plain solid panel in single crochet using Color C of the exact same dimensions.
- Assembly:
- Place the Front and Back panels wrong sides together.
- Join along three sides using a single crochet border or a scalloped edging:
*(1 sc, skip 1 st, 5 dc in next st, skip 1 st)*. - Sew a fabric lining and a zip closure into the top opening.