Intro
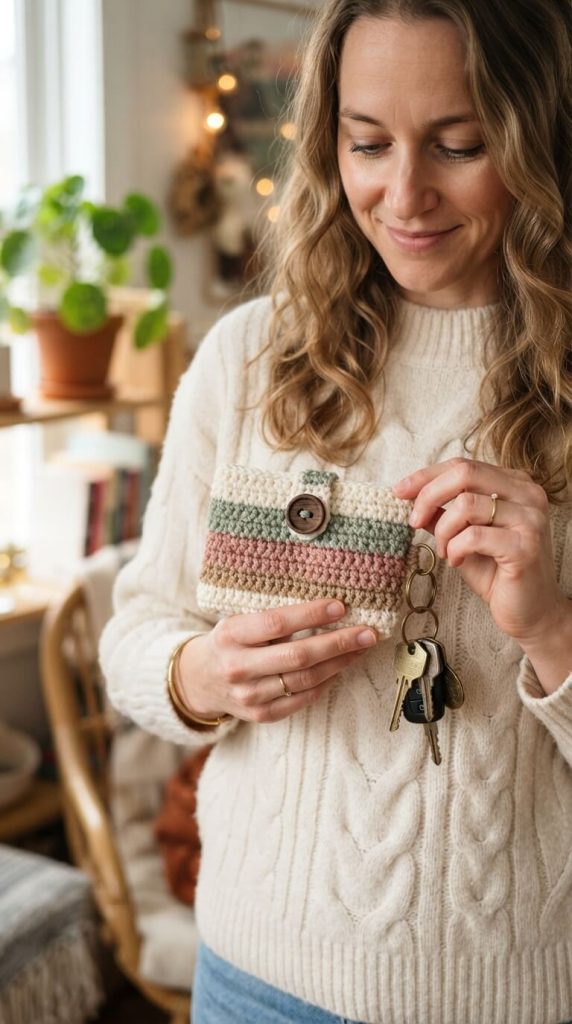
Looking for a small, useful crochet project that keeps your keys and cards organized? This soft striped key & card holder is the perfect everyday accessory. Gentle horizontal stripes in cream, sage green, dusty pink, and warm beige create a calm, handmade look, while a wooden button and keyring keep everything secure and easy to find.
It is compact, quick to make, and ideal for confident beginners.
Description
The holder is worked as a single flat rectangle in rows, then folded and seamed to form a small pouch. Soft colorblock stripes give it a pretty, modern appearance. A simple button flap closes the top, and a metal keyring is attached to the side for your keys.
The pattern uses only basic stitches and is a great way to use up small amounts of leftover yarn.
Finished Size
- Width: approximately 10–11 cm / 4–4.25 in
- Height (closed): approximately 7.5–8.5 cm / 3–3.25 in
- Height (open/flat): approximately 15–16 cm / 6–6.25 in
Measurements can vary depending on yarn, hook size, and tension.
Materials
- Worsted-weight or DK-weight cotton yarn (or soft cotton blend)
- Color A: Soft cream / ivory – approximately 20 g
- Color B: Sage green – approximately 10 g
- Color C: Dusty pink / soft rose – approximately 10 g
- Color D: Warm beige / light tan – approximately 10 g
- 3.5 mm or 4.0 mm crochet hook
- Yarn needle
- Scissors
- 1 wooden button (18–22 mm)
- 1 metal keyring or lobster clasp
- Measuring tape
Abbreviations (US terms)
ch – chain sc – single crochet hdc – half double crochet sl st – slip stitch st(s) – stitch(es)
Pattern Notes
- The holder is worked flat in rows.
- Color changes are made at the end of rows for clean horizontal stripes.
- Keep tension even so the piece lies flat and the stripes look neat.
- The button flap is created by the top section of the rectangle.
Complete Crochet Instructions
1. Main Body Panel
Using Color A (cream), chain 20.
Row 1: Hdc in the 2nd chain from the hook and in each chain across. (19 hdc) Rows 2–3: Ch 1, turn. Hdc in each stitch across. (19 hdc)
Switch to Color B (sage green).
Rows 4–5: Ch 1, turn. Hdc in each stitch across. (19 hdc)
Switch to Color C (dusty pink).
Rows 6–7: Ch 1, turn. Hdc in each stitch across. (19 hdc)
Switch to Color D (beige).
Rows 8–9: Ch 1, turn. Hdc in each stitch across. (19 hdc)
Switch to Color A (cream).
Rows 10–11: Ch 1, turn. Hdc in each stitch across. (19 hdc)
Switch to Color B (sage green).
Rows 12–13: Ch 1, turn. Hdc in each stitch across. (19 hdc)
Switch to Color C (dusty pink).
Rows 14–15: Ch 1, turn. Hdc in each stitch across. (19 hdc)
Switch to Color A (cream) for the flap section.
Rows 16–20: Ch 1, turn. Hdc in each stitch across. (19 hdc)
Fasten off, leaving a long tail for seaming.
The finished rectangle should measure approximately 10–11 cm wide and 15–16 cm long.
2. Assembly
- Fold the rectangle so the bottom edge meets just below the top cream flap, creating a pouch about 7.5–8.5 cm tall.
- Using the long cream yarn tail, sew the two side seams with whip stitch or mattress stitch.
- Weave in all ends securely on the inside.
3. Button Closure
- Position the wooden button on the front of the pouch, centered under the flap.
- Sew the button firmly in place with matching yarn or thread.
- On the underside of the flap, create a small chain loop (ch 8–10 and join with sl st) that fits comfortably over the button.
4. Attach the Keyring
- On one top side corner of the pouch, join cream yarn and chain 6–8.
- Slip stitch back into the same corner to form a small loop.
- Fasten off and weave in the end.
- Open the metal keyring and attach it through this loop.
Tips and Variations
Change the Colors
- Cream + blush + terracotta + sage
- Soft gray + dusty blue + cream + beige
- All neutral tones for a minimalist look
- Bright cheerful stripes for a playful version
Make It Larger Increase the foundation chain and add more rows for a bigger card wallet or mini clutch.
Make It Smaller Reduce the foundation chain and number of rows for a tiny key pouch.
Different Closure Replace the button with a magnetic snap or a small toggle.
Strengthen the Holder Use cotton yarn and slightly tighter tension. You can also add a thin fabric lining for extra durability.
FAQs
Is this pattern beginner-friendly? Yes. It uses only half double crochet and simple color changes. Perfect for a quick and satisfying project.
What can I carry inside? Keys, cards, cash, lip balm, earbuds, or other small everyday items.
Can I wash the finished holder? If made with cotton yarn, gentle hand washing in cool water is recommended. Reshape and lay flat to dry.
My stripes look uneven. Always change colors at the end of the row and keep your stitch count consistent. Weave in ends neatly for a clean finish.
Conclusion
This Crochet Striped Key & Card Holder is a small, practical project with a soft handmade feel. The gentle cream, sage, pink, and beige stripes create a calm, pretty look, while the wooden button and keyring make it genuinely useful for everyday life.
It is quick to make, easy to customize with different colors, and perfect as a thoughtful handmade gift or a useful little accessory for yourself. Whether you keep it in your bag or hang it by the door, this key holder is a lovely way to keep your essentials organized.
Happy crocheting!