Intro
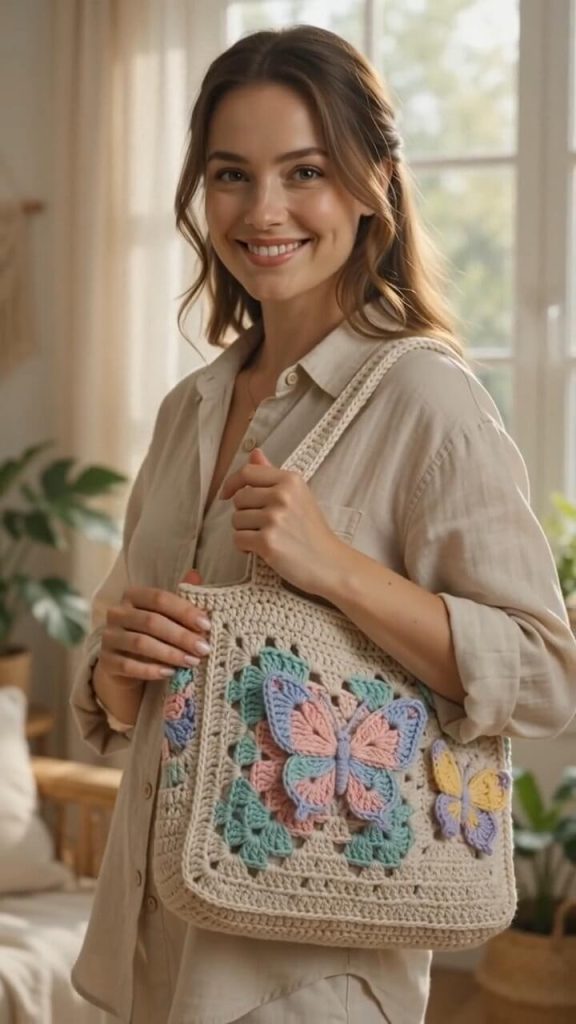
Looking for a beautiful, eye-catching crochet project that feels light and feminine? This butterfly tote bag combines classic granny square construction with colorful three-dimensional butterflies for a soft, romantic look. Soft beige forms the base of the bag, while pastel pink, lavender, mint, and yellow butterflies add cheerful movement and texture.
It is roomy enough for everyday essentials and stylish enough to wear with casual outfits.
Description
The bag is made from large granny squares that are joined together to form the front, back, and sides. After the body is assembled, several crochet butterflies in different pastel colors are sewn onto the front for a dimensional, decorative effect. Sturdy integrated handles complete the tote.
The pattern is suitable for intermediate crocheters who are comfortable with granny squares and simple appliqué work.
Finished Size
- Width: approximately 34–36 cm / 13.5–14 in
- Height (excluding handles): approximately 32–34 cm / 12.5–13.5 in
- Handle drop: approximately 25–28 cm / 10–11 in
Measurements can vary depending on yarn, hook size, and tension.
Materials
- Worsted-weight or aran-weight cotton or cotton-blend yarn
- Color A: Soft beige / light taupe – approximately 300–350 g
- Color B: Soft pink – approximately 30 g
- Color C: Lavender / light purple – approximately 25 g
- Color D: Mint / soft turquoise – approximately 25 g
- Color E: Pale yellow – approximately 20 g
- 4.5 mm or 5.0 mm crochet hook
- Yarn needle
- Scissors
- Stitch markers
- Measuring tape
- Optional: fabric lining, magnetic snap
Abbreviations (US terms)
ch – chain sc – single crochet hdc – half double crochet dc – double crochet tr – treble crochet sl st – slip stitch st(s) – stitch(es) sp – space
Pattern Notes
- The main body is constructed from granny squares.
- Butterflies are made separately and sewn on after assembly.
- Keep tension consistent so all squares are the same size.
- A lining is recommended for extra durability and a clean finish.
Complete Crochet Instructions
1. Granny Squares (Make 6–8 in Color A – Beige)
Make a magic ring.
Round 1: Ch 3 (counts as dc), 2 dc into ring, ch 2, 3 dc into ring, ch 2; repeat from * to * twice more. Join with sl st to top of ch-3. (4 corner spaces)
Round 2: Sl st to next ch-2 space, ch 3, 2 dc in same space, ch 2, 3 dc in same space, ch 1, (3 dc, ch 2, 3 dc) in next ch-2 space, ch 1; repeat around. Join.
Round 3: Sl st to next ch-2 space, ch 3, 2 dc in same space, ch 2, 3 dc in same space, ch 1, 3 dc in next ch-1 space, ch 1, (3 dc, ch 2, 3 dc) in next corner, ch 1, 3 dc in next ch-1 space, ch 1; repeat around. Join.
Rounds 4–6 (or until square measures approx. 16–17 cm): Continue in established granny square pattern, working (3 dc, ch 2, 3 dc) in each corner and 3 dc in each ch-1 space, with ch 1 between groups.
Fasten off and weave in ends. Make all squares the same size.
2. Assemble the Bag Body
- Arrange the squares: 2 for the front, 2 for the back, and 1–2 for each side (or join into a continuous panel).
- Using Color A, join the squares with slip stitch, single crochet, or whip stitch, right sides facing or wrong sides facing according to your preference.
- Join the side panels to the front and back to form a rectangular tote shape.
- Work one round of single crochet or half double crochet around the entire top edge for a clean finish.
3. Handles (Color A – Beige)
Option 1 – Integrated Handles: On the top edge, mark the handle positions (approximately 8–10 stitches wide, evenly spaced). Join yarn and chain 50–60 (or desired length). Skip the marked stitches and join to the other side. Work 3–4 rows of sc or hdc across the chain to create a strong handle. Repeat for the second handle.
Option 2 – Separate Handles: Crochet two long strips (chain the desired length + a few rows of sc/hdc), then sew them firmly to the top edges of the bag.
4. Crochet Butterflies
Large Butterfly (Make 2–3 in mixed pastel colors)
Body: Using a darker shade or the same color, chain 8. Sc in 2nd ch from hook and across. Fasten off.
Wings (Make 2 pairs per butterfly): Magic ring. Round 1: Ch 3, 2 dc, ch 2, 3 dc, ch 2, 3 dc, ch 2, 3 dc, ch 2. Join. Round 2: In each ch-2 space work (3 dc, ch 2, 3 dc) for upper wings and (2 dc, ch 1, 2 dc) for lower wings, adjusting as needed for shape. Shape into upper and lower wings, then sew the two pairs onto either side of the body.
Small Butterfly (Make 2–3) Work a simpler version with fewer stitches or smaller rounds for variety in size.
5. Attach the Butterflies
- Arrange the butterflies on the front of the bag in a balanced, overlapping composition (as shown in the photo).
- Using matching yarn tails, sew each butterfly securely through the center body and wing bases.
- Leave the outer wing edges slightly free for a more dimensional look.
- Weave in all ends on the inside.
6. Optional Finishing
- Add a magnetic snap or button closure inside the top edge.
- Line the bag with fabric for extra strength and a polished interior.
Tips and Variations
Change the Colors
- Soft beige with pastel butterflies (as shown)
- Cream base with brighter butterflies
- Light gray base with monochrome butterflies
- All neutral tones for a minimalist version
Make It Larger or Smaller Add more rounds to the granny squares or use more squares for a bigger tote. Reduce rounds for a smaller bag.
Different Embellishments Replace butterflies with flowers, dragonflies, or simple embroidered motifs.
Strengthen the Bag Use sturdy cotton yarn, work with firm tension, and add a fabric lining. You can also reinforce the handles by crocheting them thicker or adding a second layer.
FAQs
Is this pattern beginner-friendly? It is best for intermediate crocheters due to the granny square assembly and three-dimensional butterflies. Confident beginners who already know granny squares can also succeed.
What can I carry inside? Everyday items such as a wallet, phone, book, sweater, or shopping finds. The size is practical for daily use.
Can I wash the finished bag? If made with cotton yarn, gentle hand washing is recommended. Reshape and dry flat. If lined, follow the care instructions for the lining fabric.
My butterflies look flat. Sew only through the center body and base of the wings so the outer edges can lift slightly for a more realistic, dimensional effect.
Conclusion
This Crochet Butterfly Tote Bag is a soft, romantic project that combines the classic comfort of granny squares with the delicate charm of handmade butterflies. The neutral beige base lets the pastel butterflies stand out beautifully, creating a bag that feels both practical and special.
It is a rewarding make that looks far more intricate than it is, and it makes a wonderful handmade gift or a lovely addition to your own wardrobe. Whether you carry it to the market, a café, or a weekend outing, this butterfly tote is sure to bring a touch of lightness and joy.
Happy crocheting!