Intro
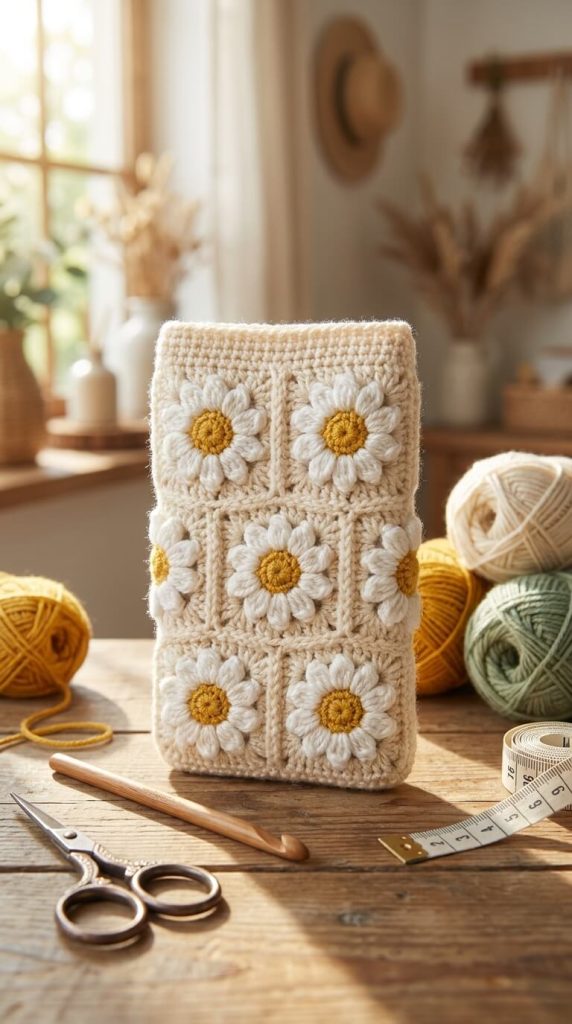
Looking for a sweet, protective crochet project for your phone or small tablet? This daisy phone pouch features a soft cream background covered with cheerful white daisies and bright yellow centers. The grid of raised daisy motifs creates a lovely textured look while keeping your device safe and stylish.
It is a charming handmade accessory that works perfectly as a phone sleeve, small book cover, or gift.
Description
The pouch is made from a series of small daisy granny squares joined together to form a rectangular panel. A matching plain or lightly textured back is added, then the two pieces are seamed along the sides and bottom, leaving the top open. The result is a soft, structured sleeve with a beautiful floral design on the front.
The pattern is suitable for confident beginners who know basic granny square techniques.
Finished Size
- Width: approximately 11–12 cm / 4.25–4.75 in
- Height: approximately 17–18 cm / 6.75–7 in
Designed to fit most modern smartphones. Measurements can vary depending on yarn, hook size, and tension.
Materials
- Worsted-weight or DK-weight cotton yarn
- Color A: Soft cream / ivory – approximately 60 g
- Color B: White – approximately 30 g
- Color C: Bright yellow – approximately 15 g
- 3.5 mm or 4.0 mm crochet hook
- Yarn needle
- Scissors
- Stitch markers
- Measuring tape
- Optional: thin fabric lining, button or snap for closure
Abbreviations (US terms)
ch – chain sc – single crochet hdc – half double crochet dc – double crochet sl st – slip stitch st(s) – stitch(es) sp – space
Pattern Notes
- Each daisy is worked as a small motif and then joined.
- Make all motifs the same size for a neat grid.
- The back can be a solid cream panel or matching daisy squares.
- Keep tension even so the pouch lies flat and fits the phone snugly.
Complete Crochet Instructions
1. Daisy Motif (Make 8–9)
Center (Color C – Yellow) Make a magic ring. Round 1: 8 sc into the ring. Join with sl st. (8) Fasten off yellow.
Petals (Color B – White) Join white in any stitch. Round 2: Ch 2, 2 dc in same st, ch 2, sl st in next st; repeat around. You will create 8 rounded petals. Fasten off white and weave in ends.
Background (Color A – Cream) Join cream in any space between petals. Round 3: Work dc evenly around the daisy, placing 2 or 3 dc in the spaces between petals to begin forming a square. Aim for 3 dc on each side and 3 dc in each corner. Round 4: Ch 3 (counts as dc), dc in each st around, working 3 dc in each corner. Join with sl st.
Each finished motif should measure approximately 5–5.5 cm square. Make 8 or 9 motifs depending on the exact size you need.
2. Join the Motifs (Front Panel) Arrange the daisy motifs in a 2-wide by 4-high grid (or 3-wide by 3-high for a slightly different layout). Using cream yarn, join the motifs with slip stitch, single crochet, or whip stitch through the back loops for a neat join. You can also join-as-you-go while working the final round of each motif.
3. Back Panel Option 1: Make a solid cream rectangle by working rows of hdc or dc until it matches the size of the front panel. Option 2: Make the same number of daisy motifs and join them the same way for a double-sided floral look.
4. Assemble the Pouch
- Place the front and back panels together with wrong sides facing.
- Using cream yarn, single crochet or whip stitch along both long sides and the bottom, leaving the top completely open.
- Weave in all ends securely.
5. Top Edge Join cream at one top corner. Work one round of single crochet evenly around the top opening for a clean, finished edge. Join with a slip stitch, fasten off, and weave in the end.
6. Optional Closure
- Sew a small button on the front and create a chain loop on the back.
- Or add a magnetic snap inside the top edge for a secure close.
Tips and Variations
Change the Colors
- Cream background with white daisies and yellow centers (as shown)
- Soft beige with blush pink daisies
- Light gray with white daisies and mustard centers
- Pastel rainbow centers for a playful version
Make It Larger Add more motifs or extra rounds around each daisy for a tablet sleeve or small book cover.
Make It Smaller Use fewer motifs or a smaller hook for a mini pouch.
Different Flowers Replace the daisies with small roses, simple layered flowers, or other motifs.
Strengthen the Pouch Use cotton yarn and firm tension. Adding a thin fabric lining will protect the phone better and give a polished interior.
FAQs
Is this pattern beginner-friendly? Yes, for confident beginners who already know how to make basic granny-style motifs and join them.
What can I carry inside? Most smartphones, cards, cash, or a small notebook. Measure your phone and adjust the number of motifs if needed.
Can I wash the finished pouch? If made with cotton yarn, gentle hand washing in cool water is recommended. Reshape and lay flat to dry.
My motifs are different sizes. Count stitches carefully and keep the same tension on every motif. Blocking them before joining also helps.
Conclusion
This Crochet Daisy Phone Pouch is a fresh, cheerful project that protects your phone while adding a touch of handmade beauty. The soft cream background and raised white daisies create a clean, pretty look that feels special without being complicated.
It is enjoyable to make, easy to customize with different flower colors, and perfect as a gift or a lovely accessory for yourself. Whether you keep it in your bag or on your desk, this daisy pouch is sure to bring a little sunshine to your day.
Happy crocheting!