Many free crochet patterns for large hanging organizers fail because they do not account for structural sag, weight distribution, or proper pocket construction. When hung behind a car seat, a flimsy or stretchy yarn will drag down under the weight of water bottles, phones, and travel accessories.
This corrected guide breaks down the precise structural dimensions, stitch selections, and assembly techniques visible in the design to ensure your backseat organizer sits flat, holds its shape, and remains durable.
Technical Specifications & Design Breakdown
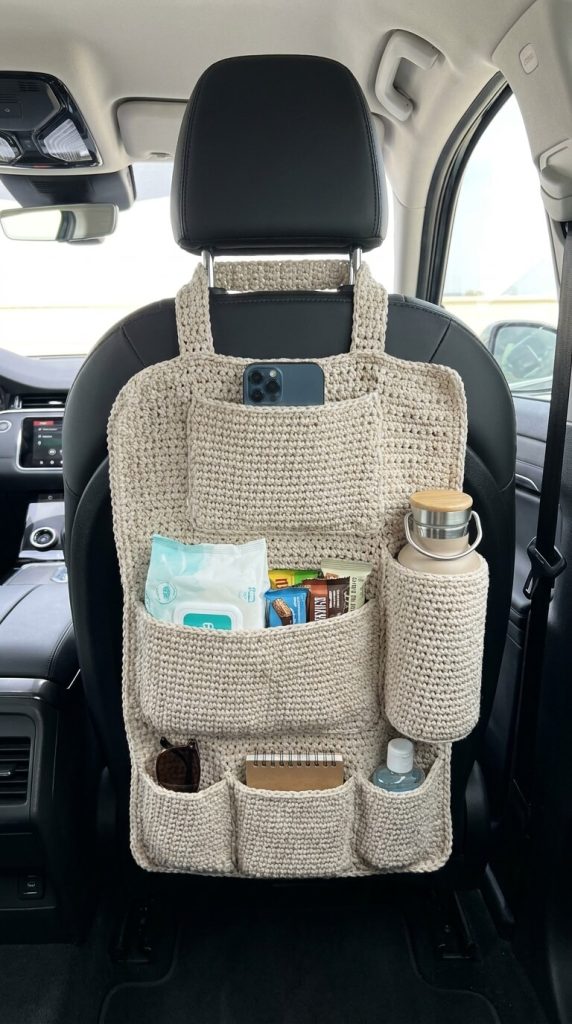
Looking closely at the organizer:
- Backing Panel: A dense, non-stretching single crochet mesh panel with rounded upper corners that contour gracefully around the headrest area.
- Headrest Mounting: Two sturdy hanging straps attached at the top, secured around the headrest posts with a reinforced connector bar across the middle.
- Pocket Layout:
- Top Pocket: Slim flat pouch customized for smartphones.
- Middle Main Pocket: Deep, wide pouch with gusset depth for wet wipes, snacks, and bulky travel items.
- Side Cylindrical Pocket: A 3D structured bottle holder constructed with a flat round base to hold heavy travel mugs or water bottles securely.
- Bottom Row: Three equal-sized slip pockets for small items like sunglasses, hand sanitizer, and notebooks.
Required Materials
- Yarn: 400g / 480m of 5mm Braided Cotton Cord or T-Shirt Yarn (Ecru/Linen tone).
- Crucial Note: Avoid standard 100% acrylic or light cotton yarn. A stiff, low-stretch braided cord or heavy macramé yarn is mandatory to prevent sagging.
- Hook Size: 5.0 mm or 5.5 mm (Work tightly to maintain a rigid fabric gauge).
- Reinforcement (Optional but Recommended): Flexible plastic canvas mesh or a thin acrylic board cut to fit the back panel, preventing any mid-body bending.
- Notions: Heavy-duty tapestry needle, stitch markers, measuring tape, and scissors.
Pattern Abbreviations (US Terms)
- Ch: Chain
- Sc: Single Crochet
- Inc: Increase (2 sc in same st)
- Dec: Decrease (Sc 2 sts together)
- Sl St: Slip Stitch
- St(s): Stitch(es)
- BLO: Back Loop Only
Step-by-Step Crochet Instructions
1. The Heavy-Duty Backing Panel
The backing panel measures approximately 38 cm (15 inches) wide by 55 cm (22 inches) long.
- Foundation Chain: Ch 46.
- Row 1: Sc in 2nd ch from hook and in each ch across. Turn. (45 sts)
- Rows 2 – 70: Ch 1, sc in each st across. Turn. (45 sts)
- Shaping the Top Edges (Rows 71 – 76):
- Row 71: Ch 1, dec, sc across to last 2 sts, dec. Turn. (43 sts)
- Row 72: Ch 1, sc across. Turn. (43 sts)
- Row 73: Ch 1, dec, sc across to last 2 sts, dec. Turn. (41 sts)
- Row 74: Ch 1, sc across. Turn. (41 sts)
- Row 75: Ch 1, dec, sc across to last 2 sts, dec. Turn. (39 sts)
- Row 76: Ch 1, sc across. Turn. (39 sts)
- Border: Ch 1, work a single crochet border evenly down all sides of the panel, placing 3 sc in the two bottom corners for a rounded, finished edge. Fasten off and weave in ends.
2. The Upper Headrest Straps
- Left Strap: Reattach yarn at the top left edge of Row 76 across 6 stitches.
- Rows 1 – 16: Ch 1, sc in 6 sts. Turn. (Creates a 6-stitch wide strap approx. 12 cm long). Fasten off, leaving a long tail for sewing or securing around the headrest post.
- Right Strap: Repeat the same process on the top right edge of Row 76 across 6 stitches.
- Center Connector Bar: Attach yarn to the inner edge of the left strap at Row 8. Ch 15 (or distance matching headrest posts), sl st to the right strap. Work 2 rows of sc across this bridge to form the crossbar visible beneath the headrest.
3. Individual Pockets Construction
A. Top Phone Pouch
- Foundation: Ch 19.
- Rows 1 – 14: Ch 1, sc in each st across. Turn. (18 sts)
- Fasten off with a long tail.
B. Middle Deep Storage Pouch
To allow bulky items like wet wipes to fit without pulling the backing flat, this pocket requires depth gussets.
- Front Panel: Ch 27. Work 16 rows of sc. (26 sts)
- Gusset Strip (Sides & Bottom): Ch 5. Work sc in rows across 4 sts for a length matching the side, bottom, and side total edge of the front panel (approx. 48 rows).
- Assembly: Stitch the gusset strip around the bottom and sides of the front panel using tight single crochet or mattress stitch to form a 3D box pocket.
C. Cylindrical Water Bottle Holder
- Base:
- Round 1: 6 sc in magic ring. Sl st to join. (6)
- Round 2: 2 sc in each st around. (12)
- Round 3: [1 sc, inc] x 6. (18)
- Round 4: [2 sc, inc] x 6. (24)
- Round 5: [3 sc, inc] x 6. (30)
- Body Walls:
- Round 6: Sc in BLO of all 30 sts around. (Establishes the flat bottom corner).
- Rounds 7 – 22: Working in both loops, sc in each st around. (30 sts)
- Fasten off.
D. Bottom 3-Section Pouch Array
- Foundation: Ch 46.
- Rows 1 – 18: Ch 1, sc in each st across. Turn. (45 sts)
- Fasten off with a long tail.
Assembly & Stitches Placement Guide
- Blocking: Steam block all flat pieces prior to sewing so all edges are perfectly straight.
- Top Pocket: Centered 2 cm below the top edge of the main backing panel. Sew along sides and bottom.
- Middle Pouch & Bottle Holder:
- Position the middle box pouch on the left/center of the midsection. Stitch the back edge of the gusset strip firmly onto the panel.
- Position the cylindrical bottle holder on the right side. Sew the back 10 stitches of the cylinder body vertically onto the panel, securing the bottom base ring as well.
- Bottom Row Array:
- Align the large bottom panel flush with the bottom and side edges of the main backing.
- Sew along the outer left side, bottom edge, and outer right side.
- Divide the 45-stitch width into 3 equal sections (15 stitches each). Sew 2 vertical lines through both layers from bottom to top to create 3 independent pockets.
- Final Mounting: Wrap the top straps around the headrest poles of your car seat and attach securely using heavy-duty metal snaps, buttons, or firmly sewed seams.