Description
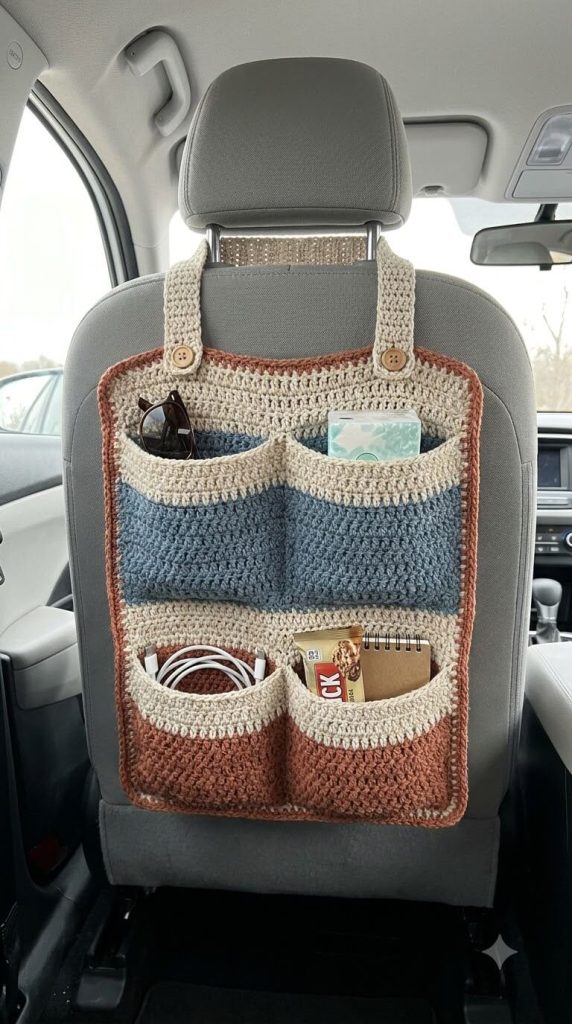
The caddy is worked in a firm, durable stitch that holds its shape well with daily use. Horizontal color blocks in cream, dusty blue, and terracotta create a clean, modern look. Several open pockets of varying sizes keep items secure yet easy to reach. Two wide straps with wooden buttons slip over the headrest posts so the organizer hangs securely on the back of the seat.
Suitable for confident beginners to intermediate crocheters who know basic stitches and simple color changes.
Finished Size (approximate)
- Width: 30–35 cm / 12–14 in
- Height: 40–45 cm / 16–18 in (excluding straps)
- Strap length: adjustable to fit most car headrests
Size can vary depending on yarn, hook size, and tension.
Materials
- Worsted-weight or aran-weight cotton or acrylic yarn
- Color A: Cream / off-white
- Color B: Dusty blue / soft slate
- Color C: Terracotta / rust
- 4.5 mm – 5.5 mm crochet hook
- 2 medium wooden buttons (approx. 20–25 mm)
- Yarn needle
- Scissors
Abbreviations (US terms)
- ch – chain
- sc – single crochet
- hdc – half double crochet
- dc – double crochet
- sl st – slip stitch
- st(s) – stitch(es)
Pattern Notes
- The main body is worked in rows with color changes for the stripes.
- Pockets are added by crocheting extra layers or sewing on separate pocket pieces.
- Straps are made separately and attached at the top with buttons.
- Keep tension firm so the caddy holds its shape when filled.
Complete Crochet Instructions
- Main Body
With Color A, crochet a firm rectangle for the back panel.
Change colors to create the horizontal stripes (cream → blue → cream → terracotta).
Continue until the desired height is reached. - Pockets
Crochet several pocket pieces in matching colors (different widths and depths for sunglasses, tissues, cables, snacks, etc.).
Sew or crochet them onto the front of the main panel, leaving the top edges open. - Straps
Make two wide straps in cream.
Attach one end of each strap to the top corners of the caddy.
Add a buttonhole or simple loop on the free end of each strap. - Assembly & Finishing
Sew the two wooden buttons onto the front so the straps can fasten securely over the headrest.
Weave in all ends carefully.
Optional: lightly block to neaten the shape.
Tips and Variations
- Change the stripe colors to match your car interior (gray & black, navy & cream, etc.).
- Add an extra pocket or a small zipper pouch for valuables.
- Make the straps longer or shorter to fit different headrest styles.
- Use cotton yarn for better durability and less stretch.
FAQs
Is this pattern beginner-friendly?
Yes for confident beginners. The body and pockets use basic stitches; attaching the straps and buttons is straightforward.
How long does it take to make?
Most makers finish one caddy in 4–6 hours.
Can I wash it?
Yes – if made with cotton or acrylic yarn. Gentle hand wash and lay flat to dry.
Will it fit my car headrest?
Designed to fit most standard car headrests. You can easily adjust the strap length if needed.
This practical crochet car seat caddy in cream, blue, and terracotta is a useful project that combines everyday function with handmade style. Perfect for keeping your essentials tidy and within easy reach while you drive.